
Start
Getting started
The Retros module of NABS Confidence keeps agile retrospectives in the repository they are about. This page is the short path from a VSIX file to a first retro.
What it is
You work in VS Code. The extension adds a Retros view, a Home page, and a Retro Dashboard for each retro. The files it writes are ordinary Markdown, so they are committed, reviewed and shared with Git like the rest of the repository.
A retro covers a period (14 days by default, ending on the retro date). It can hold a summary of that period, the team’s feedback, the objectives the retro focuses on, action items, and a short note of what to share upwards.
What you need
- VS Code 1.120 or newer, stable or Insiders.
- Git on the PATH, and a folder that is a Git repository. Retros still open in a folder that is not a repository, but there is no history, no Git insights, and no way to share the files by pushing.
- GitHub Copilot Chat, signed in, if you want summaries and objective assessments. Copilot Free is enough. Everything else works with
nabsConfidence.useAIturned off. - A github.com
originremote if you want GitHub issues, pull requests and discussions in the insights, issues created from action items, or an archive to a Discussion. GitHub Enterprise is not supported.
Install
NABS Confidence is not published on the VS Code Marketplace. Install it from a .vsix file your team provides.
- Open the Extensions view.
- Open the … menu (Views and More Actions) and choose Install from VSIX….
- Pick the file, for example
nabs-confidence-0.12.0.vsix.
From a terminal, the same install is code --install-extension nabs-confidence-0.12.0.vsix (or code-insiders if you use Insiders).
The extension id is nabs.nabs-confidence. If you still have an older package installed under the previous id, uninstall that one first, or both will be loaded. The first time the extension uses Copilot, VS Code asks whether it may use the language model. Choose Allow.
Your first retro
- Use File > Open Folder… and open the repository.
- Click the NABS rocket in the Activity Bar. Home opens when the Retros view becomes visible and no editor tab is open. You can also run NABS Confidence: Open Home.
- If the team has no objectives yet, Create the First Objective is the place to start. An objective is a goal with acceptance criteria. You can also start a retro with none; the extension warns you, and you can still continue. See why objectives matter.
- Choose New Retro…. Check the date and the period (by default the last 14 days, ending on the retro date). Add a title if you want one, such as “Sprint 42”. Tick the objectives this retro should focus on. Open ones start ticked.
- Click Create Retro. If VS Code asks to sign in to GitHub, allow it for issues, pull requests and discussions, or cancel to skip GitHub data. The new retro opens on the Retro Dashboard at Prepare.
- Commit and push the new files so the rest of the team can see the retro, then copy the invitation from Prepare. The extension never sends it for you.
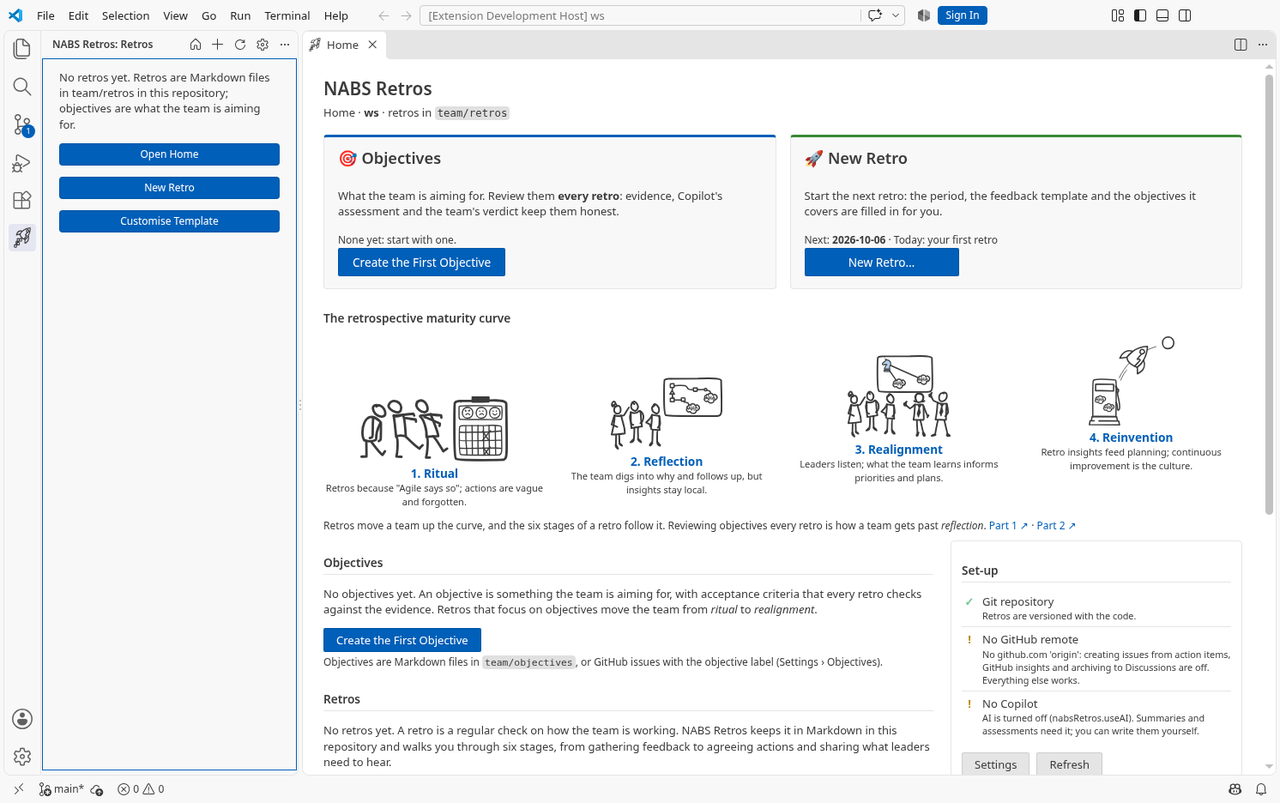
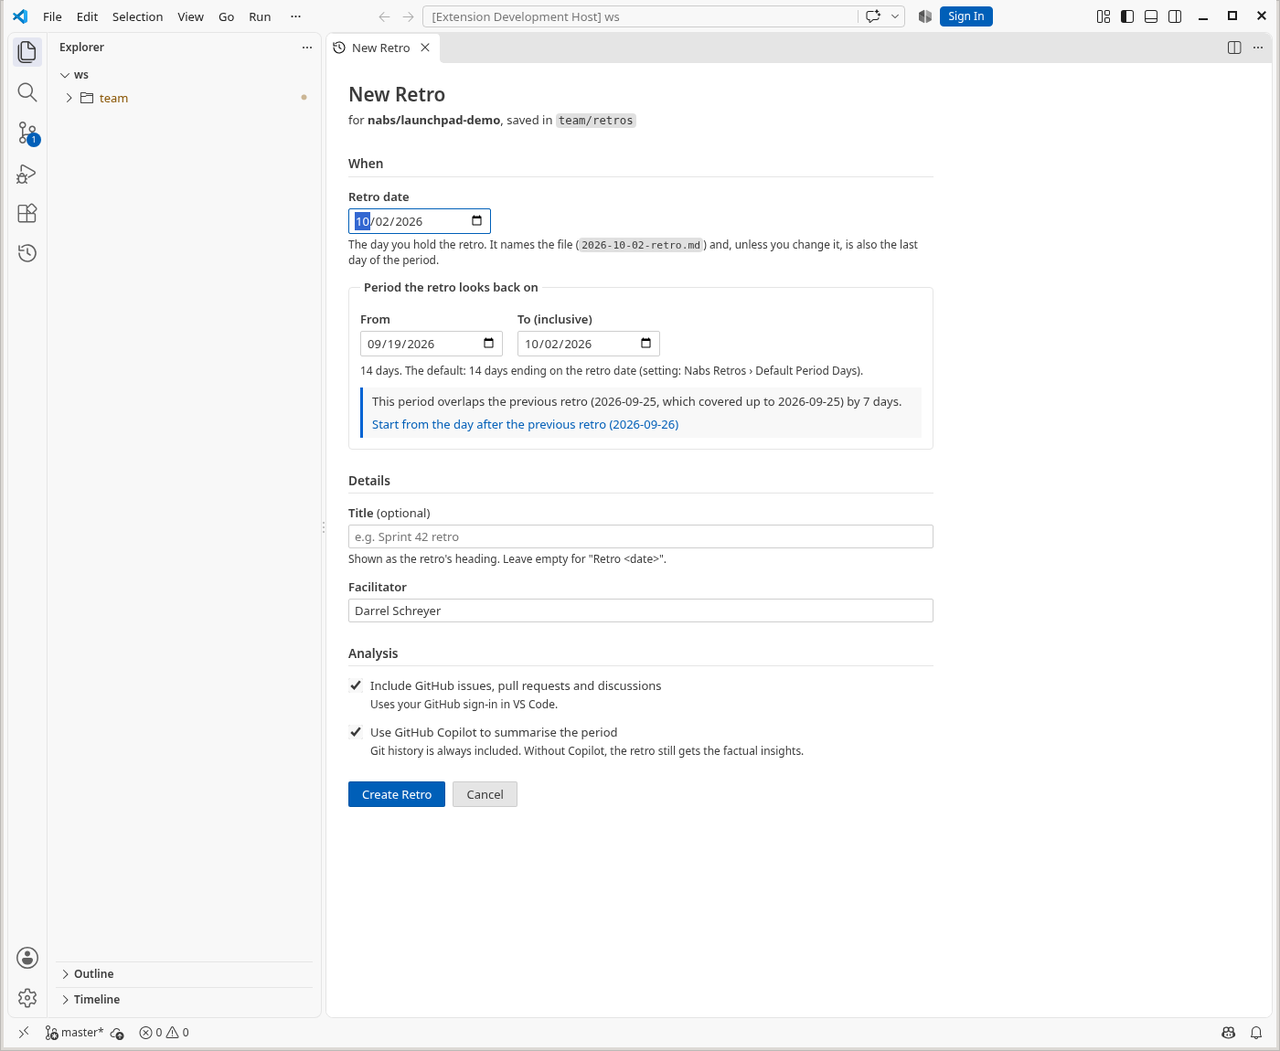
Check the date when you start from Home. Home shows a suggested date for the next retro. The Start the … Retro… button opens this form, and today the form’s date is reset to today rather than kept as the suggested date. Set the date yourself before you click Create Retro. The period, the feedback template and the open objectives still follow the form’s own defaults.
Where the files go
By default, retros are written under team/retros/ and objectives under team/objectives/. Both folders are settings, so a team can choose others. The shape of the files is described in Retros as Markdown.
Coming soon. A guided view exists for Prepare and Gather only. Insights, Objectives, Decide, and Close & share link out to the panels that already exist.